
-
Creado por
 Hector Castillo Andreu el ago 21, 2026
10 min de lectura
Hector Castillo Andreu el ago 21, 2026
10 min de lectura
What is Microsoft 365 Multi-Factor Authentication (MFA or 2FA)?
Multi-factor authentication (MFA) is a process by which, during a service session initiation (VPN, Microsoft 365, Teams, etc.), additional identification is requested by the user. For example, you can enter a code into your phone or approve it in a mobile app. To require a second form of authentication, security increases, because this additional factor is not easy to obtain or duplicate for an attacker.
For multi-factor authentication (MFA), we opted for a configuration with a double factor authentication (2FA).
What is necessary for its operation?
To use multifactor authentication, it is necessary:
- Enable multifactor authentication.
- Configure the authentication methods to allow second validation on your other device.
- A mobile device will perform this validation.
- RECOMMENDED OPTION: The recommended option for your convenience is installing the Microsoft Authenticator app on your mobile. Furthermore, it is recommended to use the alternate method of the telephone call.
How to enable Multi-factor authentication?
The double factor authentication is activated by fault for various colectivos, between which the ALUMNOS colectivo is displayed.
You can check if it is activated on the intranet, (depending on the colectivo you have, if you encounter other Herramientas or apartado Services, in the block of "Office 365" on your intranet.
Only in the case you have not been activated, you must activate it.
It will be necessary to activate multifactor authentication on your intranet:


How to configure Multi-Factor authentication?
The first thing we need to configure is the authentication options available to us to allow second validation. To do this, please access the following links https://www.upv.es/id/373 and follow the following steps:
Introducing our new user: usuario@upv.edu.es

- We will see a window, which will redirect us to the new intranet to identify us.

- We log in on the intranet with our credencials
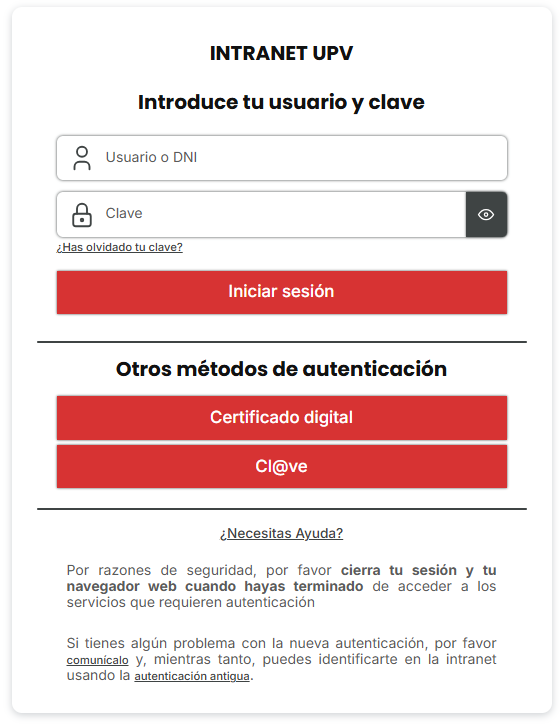
- We can select that you maintain the initial session.

- Click on "Siguiente" (next):

At this point, configure the options for validation. Of the available session initiation methods, the most recommended option is to use notifications in the mobile application , to make it more convenient and one of the most secure. This option requires installing an app on our new mobile phone, available for iOS and Android in the App Store and Google Play respectively: https://www.microsoft.com/es-es/security/mobile-authenticator-app
Please ensure that we have installed the authentic Microsoft application, there are applications with the same number and icons. The most secure format to download the authentic application is accessed via previous https://www.microsoft.com/es-es/security/mobile-authenticator-app , and scan the QR code that appears, where we will access the authentic application directly.

- Please note, if we have decided on the previously recommended option, select "mobile application" and "Receive notifications for verification", we must install the Microsoft Authenticator application on the mobile, if it is not installed.
https://www.microsoft.com/es-es/security/mobile-authenticator-app - Once you have installed the application, you can continue, press the configure button, to access the mobile and launch the Microsoft Authenticator app, configure the cue to receive notifications.

- To configure, in the previous step, we will send a QR code, necessary to scan in a later step from the Microsoft Authenticator mobile application.

- When you install the application on your mobile (if you don't have it installed), you must configure it again.
We can use the QR code scan of the device owner, and in this case, we can switch directly to point 11, without the need to carry out the steps from point 10. Only the cue will be configured directly.
If we do not use the QR code scan of the device owner, we must follow the following steps:- Open the app:
- Press the menu “Agregar cuenta” (add acount)

- We choose "Cuenta profesional o educativa". (professional or educational):

- Select the option to scan a QR code and insert the camera onto the screen.

- Open the app:
- If everything is working correctly, the cue will be registered on the new mobile app, we will request approval via a notification on the screen if you want to initiate the session.

- Once you have added the cue to the Microsoft Authenticator app, you can continue with the team to add alternate validation in case you lose access to the mobile app.

NOTA
At any time, you can access the configuration, add other validation alternatives or modify the current configuration, access via https://www.upv.es/id/373
How to initiate a session with one of the available services (teams, o365...) with double factor?
Once you have activated multifactor authentication on the intranet and carried out the configuration steps, every session you initiate activates the mechanism to request the double factor, there is a notification in the Microsoft Authenticator app or a telephone call . To use the key only you must hold the key and press "#"
En algunos dispositivos móviles, si en la configuración de la aplicación Microsoft Authenticator, está configurado el Bloqueo de aplicación (huella digital o pin), aunque se apruebe la notificación, da un error denegando el acceso. En tal caso, debemos desactivar el bloqueo de aplicación.
- Accedemos a la configuración de la aplicación Microsoft Authenticator

- Desactivamos el bloqueo de la aplicación y volvemos a probar.

Ejemplo de acceso a la página web de Office 365
Este ejemplo, sería válido, tanto para el acceso a O365, como a cualquiera de sus aplicaciones, como Teams, OneDrive, etc.
- Accedemos la web o365.upv.es

- Nos identificamos con nuestras credenciales de la UPV.
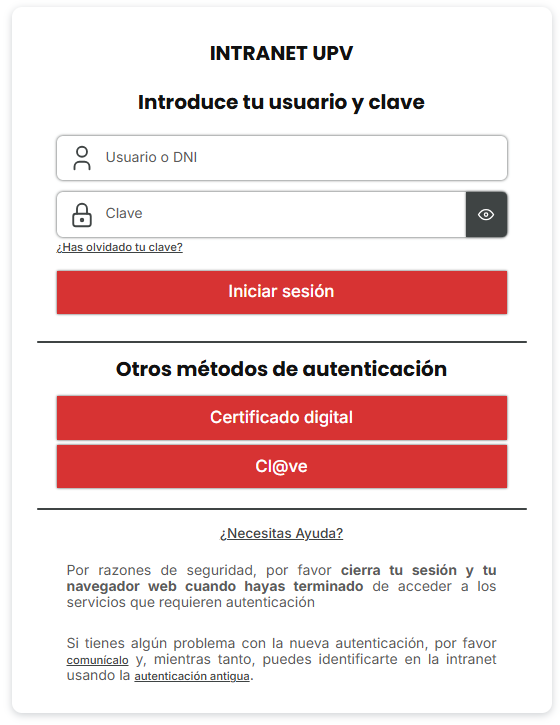
- Nos aparecerá un mensaje como el siguiente:

- En este caso, la opción preferida es la de la app Microsoft Authenticator, pero si no la tuviéramos disponible en ese momento, podríamos cambiar a otro método de los que hemos configurado pulsando en el enlace que se muestra en pantalla.

- Manteniendo la opción (recomendada) de "aprobar una solicitud en la aplicación Microsoft Authenticator", veremos que, en el móvil, recibiremos una notificación que deberemos aprobar.

- Si no pulsamos en el momento, podemos acceder a notificaciones y desplegar la notificación para aprobarla.

Ejemplo de conexión a la VPN
Las capturas de pantalla para la conexión a la VPN, están tomadas desde un Windows 10.
Creamos la configuración VPN siguiendo la guía VPN en Windows10/11
- Nos conectamos a la VPN

- Introducimos las credenciales de upvnet (usuario@upvnet.upv.es en caso de dominio UPVNET o usuario@alumno.upv.es en caso de ser del dominio ALUMNO)

- Una vez introducidas las credenciales, indicará "comprobación de la información de inicio", y estará pendiente de aprobar la solicitud en el dispositivo móvil.

- En el móvil, donde tendremos instalada la app Microsoft Authenticator, recibiremos una notificación que deberemos aprobar.
- Si no pulsamos en el momento, podemos acceder a 'notificaciones' y desplegar la notificación para aprobarla.
- Una vez aprobada la notificación en el dispositivo móvil, veremos que la VPN se ha conectado.

¿Qué ocurre si cambiamos, perdemos o nos roban un dispositivo en el que tenemos configurada la app Microsoft Authenticator?
En este caso, deberemos desactivar ese dispositivo cuanto antes para evitar que pueda ser utilizado por otra persona.
Para ello, hay que iniciar sesión utilizando un método alternativo (o validarlo con el móvil viejo en caso de cambio y si aún disponemos de él) y dirigirse a la página de configuración del MFA ( https://www.upv.es/id/373 ) para eliminar el dispositivo de la lista.
Si no fuera posible iniciar sesión, al no disponer de otro método alternativo, como pueda ser otro móvil o teléfono, podemos contactar con el CAU (https://cau.upv.es) para solicitar que nos restablezcan la configuración.
Cada dispositivo móvil donde hemos instalado el Microsoft Authenticator aparecerá en la página citada anteriormente, que en realidad, le redirigirá a la página web siguiente:
https://mysignins.microsoft.com/security-info
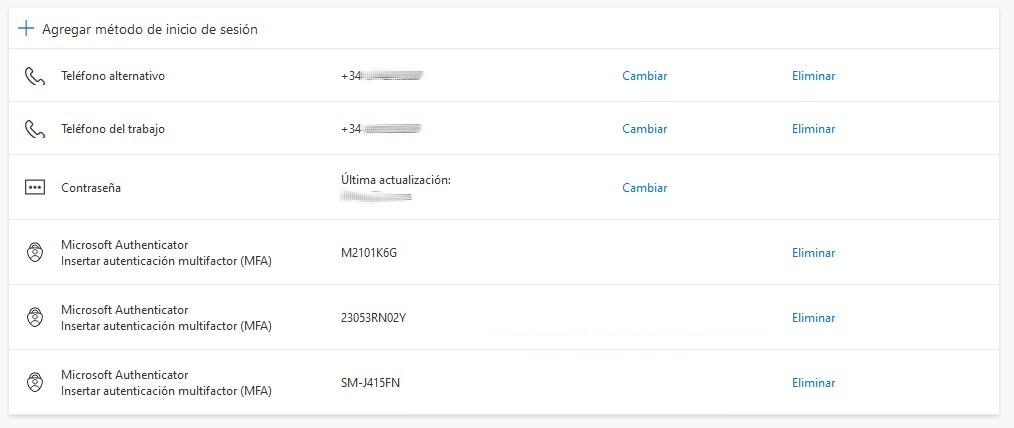
En este caso de ejemplo, el usuario tiene configurados dos móviles, por lo que en caso de pérdida de uno de ellos, puede utilizar el otro para autenticarse en los servicios de Microsoft.
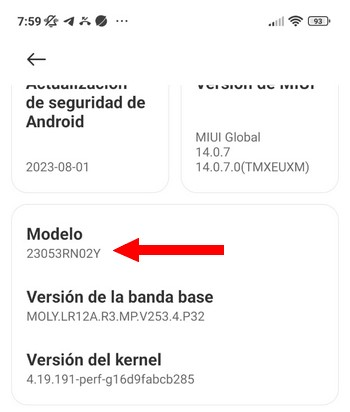
Sin embargo, en la parte de bajo, vemos tres móviles registrados con los siguientes identificadores de modelo de móvil: M2101K6G, 23053RN02Y y SM-J415FN.
Es decir, que el usuario en algún momento instaló y configuró la app Microsoft Authenticator en tres móviles, aunque alguno de ellos haya sido destruido físicamente, o restablecido a valores de fábrica, o ya no lo tenga en propiedad.
Sería conveniente pulsar sobre el enlace "Eliminar" para anular el móvil que ya no se esté utilizando.
Si no sabemos cuál es, deberemos buscar (en los móviles que todavía utilizamos) el identificador del modelo del móvil, de modo que solo dejaremos activos los móviles de los que todavía disponemos y por lo tanto, el resto de identificadores podrán ser eliminados como dispositivos válidos de autenticación.
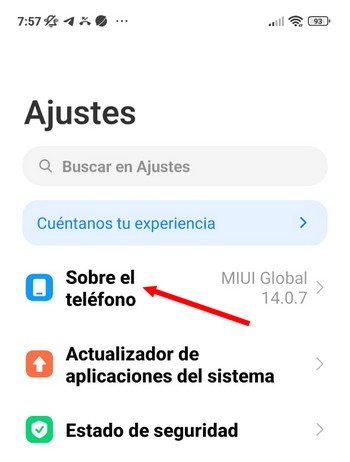
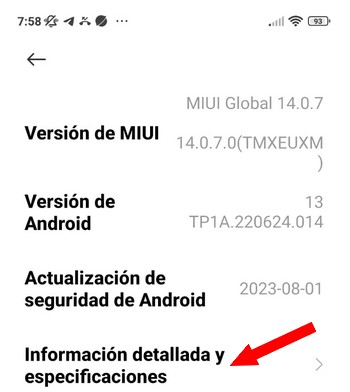
En el caso de Android 13, por ejemplo, podemos ver el modelo de móvil que tenemos desde:
Ajustes
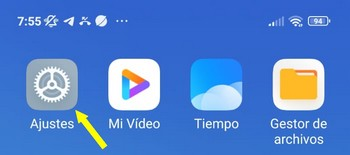
Seleccionamos dentro de Ajustes la opción denominada: "Sobre el teléfono"
Elegimos "Información detallada y especificaciones"
Y accedemos a la información del modelo.
He configurado la llamada a mí número de móvil y no recibo la llamada de verificación (2FA)
Los números utilizados por Microsoft para las llamadas de verificación pueden ser desconocidos o tener un formato poco habitual. Si estás iniciando sesión en un servicio que tiene configurada la verificación en dos pasos (2FA), una llamada de este tipo puede formar parte del proceso de autenticación. Si tienes dudas sobre la legitimidad de la llamada, no respondas y vuelve a iniciar sesión en el servicio. Si la llamada vuelve a recibirse coincidiendo con la nueva solicitud de acceso, podrás confirmar que forma parte del proceso de verificación.
Si no recibes la llamada para completar la verificación en dos pasos, revisa la lista de números bloqueados de tu teléfono móvil.
En algunos casos, el número utilizado por Microsoft para realizar la llamada de autenticación ha sido bloqueado previamente por el propio usuario, creyendo que se trataba de una llamada de spam o fraudulenta, lo que impide que la llamada llegue al dispositivo.
Recomendación: Accede a la configuración de llamadas de tu teléfono y comprueba si el número que intenta realizar la verificación se encuentra en la lista de números bloqueados. Si es así, elimínalo de dicha lista y vuelve a solicitar la llamada de verificación.
Quiero configurar como método de autenticación 2FA la extensión del trabajo
Existe la posibilidad de configurar como método de autenticación, la extensión telefónica del trabajo. Para ello, seguimos los siguientes pasos:
- Accedemos a la página de configuración del MFA ( https://www.upv.es/id/373
- Agregamos un método de autenticación y seleccionamos la opción "teléfono del trabajo"
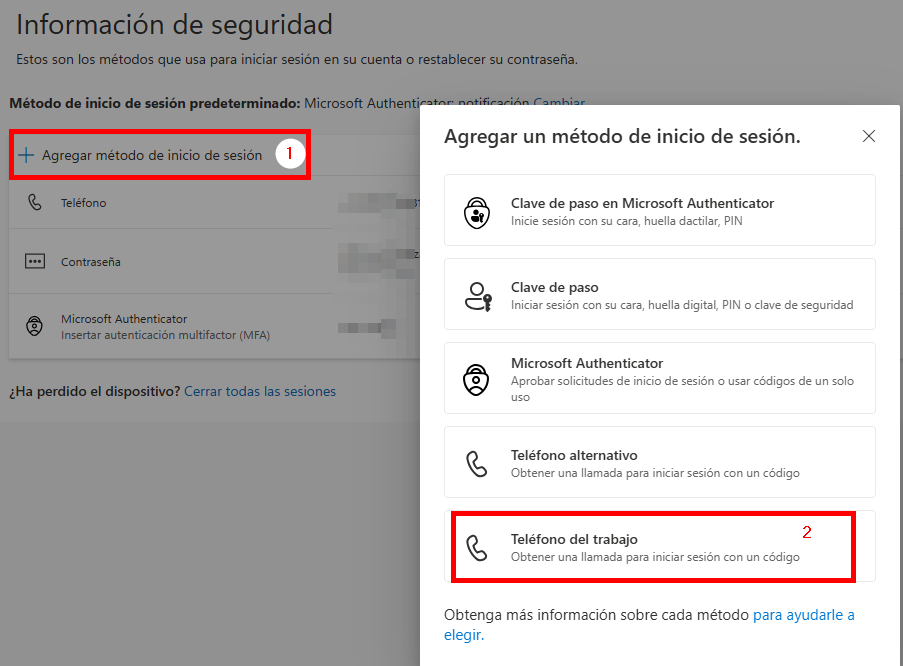
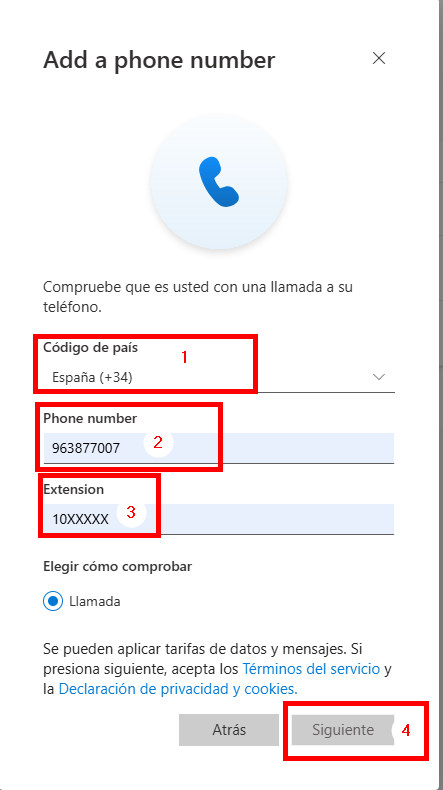
- Configuramos los siguientes campos:
- Código de país: "España (+34)
- Phone number: 963877007
- Extesión: 10XXXXX (Dónde XXXXX es la extensión que tengamos)
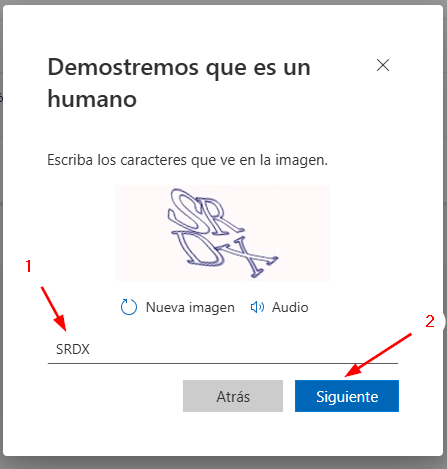
- Puede perdirnos que por seguridad, indiquemos los caracteres que se muestren en la imagen. Los escribimos y pulsamos en siguiente:
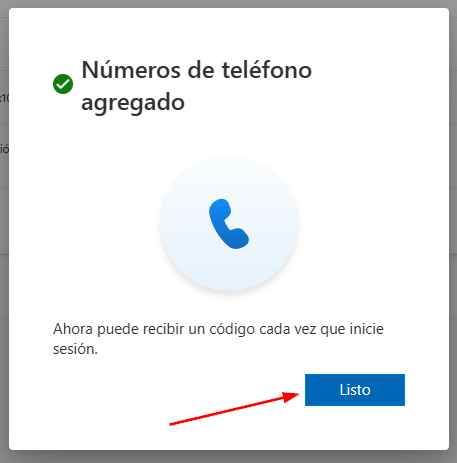
- Nos hará la llamada a la extensión, una vez escuchemos la locución, pulsaremos en la tecla # del teléfono fijo
- Y para finalizar, pulsaremos en el botón listo.
- Si queremos configurar este método como predeterminado:
- Pulsamos en "Cambiar" del método de sesión predeterminado.
- Pulsamos en el desplegable
- Y seleccionamos el teléfono que hemos configurado: +34 963877007 x 10XXXXX
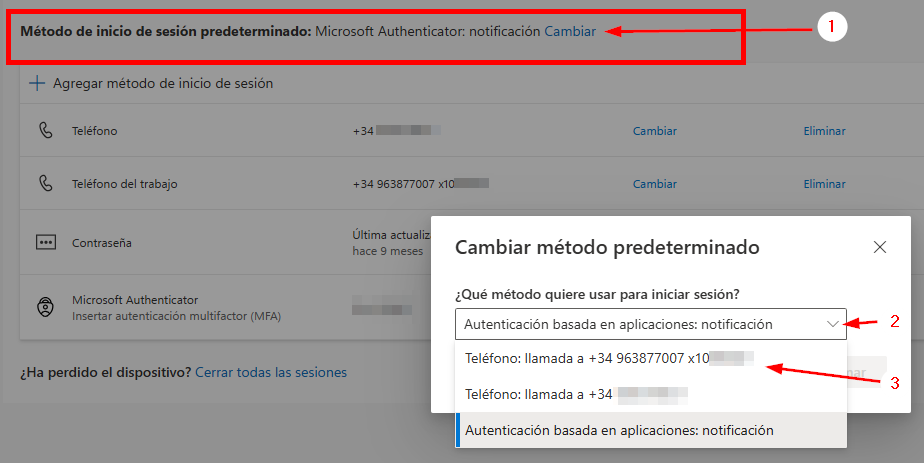
- Una vez seleccionado, pulsamos en el botón "Confirmar"